Dishwashers are great to work with until they start leaking, a common problem dishwasher owners face. You are at the right place if your dishwasher is leaking into the basement. I’ll discuss some effective ways to fix this issue.
Generally, a dishwasher may leak into the basement because of the clogged drain hose. Unclog the debris or replace it completely. Check the door gasket of the dishwasher, clean any stuck debris, and replace it if damaged. Also, inspect the spray arm for cracks and replace them if needed.
In this article, I will help to understand all the possible causes of your dishwasher leaking into your basement. You will also learn how to fix the issue. So, keep reading.

Check out our list of top-handpicked products for all your electrical, appliance, and HVAC system needs to keep your home running smoothly.
This post includes some affiliate links.Why is my dishwasher leaking into my basement?
People who use dishwashers face different issues as these are sensitive appliances.
I understand how frustrating it feels to deal with a dishwasher leaking in the basement, which reduces the productivity of kitchen activities.
I have been there, but I did my research and successfully fixed the issue.
While doing so, I found some common causes of dishwashers leaking into the basement.
Here are the 10 common causes that can lead to this problem.
1. Faulty door gasket
If you are wondering what a door gasket is, it is found beneath the door, running along the perimeter of the dishwasher’s door.
The gasket sealing keeps the door secured during the wash cycle.
It is the rubber material that closes the door firmly to avoid accidental openings and spillage.
In the long run, this gasket attached to the door may harden, losing its elasticity.
It also happens due to debris and dirt accumulation.
If you find the leakage into the basement, start by checking the gasket.
You can see this gasket seal both on the upper and lower side of the dishwasher.
If the upper gasket is at fault, it is easy to fix.
In contrast, fixing the gasket at the lower side is difficult.
You must consider hiring a professional, as the fixing process involves removing the door from the dishwasher.
The door cannot be closed during the wash cycle when a gasket fault occurs.
It will cause leakage.
Follow these steps to fix the new gasket if you find the existing gasket faulty:
- Start fixing by locating the gasket after turning off the electricity.
- Access the gasket and remove the damaged gasket by pulling it on the opposite side using needle nose pliers.
- Now take the new gasket before placing it clean the dishwasher gasket chamber to wipe out the accumulated dirt and debris.
- Fix the new gasket into the chamber by pushing the dishwasher up and down the channel.
- After doing this, if you find excess gasket material use a knife or scissors to cut it.
- Finally, keep the lower rack in place. Shut the door, and leave it unopened for at least two hours for the gasket to seal with the door.
- Run the dishwasher to check for any leaks.
2. Spray arm fault

Spray arms are an essential part of the dishwashers as they sprinkle the water throughout the dishes during a wash cycle.
You can’t inspect them from the outside and must look into the dishwasher to check if they are at fault.
These spray arms might become the reason for leaks when dishes are inappropriately loaded during a wash cycle.
Because when dishes are not placed in the right way, they tend to block the spray arm, and they also secure them from rotating.
Doing this decreases the dishwasher’s cleaning quality and cracks or damages the spray arms over time.
If there are cracks in those spray arms, leakage will occur.
You can fix the damaged spray arm by following these steps:
- Cut off the electric supply from the dishwasher. Open the door to take off the lower rack.
- Locate the nut securing the spray arm. Remove it by turning it in a counterclockwise direction. Now you can easily remove the arm from the dishwasher.
- After removing it, you can inspect the place which holds the arm spray. If you find dirt accumulation, clean it with soapy water.
- Now you must examine the arm spray body by inserting the pipe cleaner into the holes to sense any damage. If you find it damaged, replace it.
- Take the new water spray arm, and place that in the washer tub. Tighten the screws.
- Examine if it can turn around well without any obstruction.
- Now let’s inspect the spray arm on the upper rack.
- See if it has any cracks or damage. Then you have to replace it.
- You can take off the upper spray arm by unscrewing the screws.
- Install the new upper spray arm and again secure it with the screws.
3. Malfunctioning float switch
To fix this fault, you want to understand how the float assembly system works in the dishwasher.
The float assembly system contains the float and the float switch.
The float can be identified as the cylindrical plastic device located at the bottom of your dishwasher.
This float rises when the water level rises during a rinse cycle.
The float switch will automatically turn off when the appropriate level is reached.
Flooding occurs in the kitchen if the float stays at the bottom without rising along the water.
Sometimes switches may be at fault due to loose wire connections.
In both cases, you need to take immediate actions to fix it.
Follow this step-by-step process to fix the faulty float switch:
- Turn off the electricity. Ensure it by checking if the control panel lights are blowing.
- You have to open the door and the control panel to access the float switch, which you can find beneath the doors. Remove the screws securing the door and the control panel to remove it.
- Now separate the control panel from the control wire harness.
- As a next step, you must take off the front access panel. Keep the nut driver handy to unscrew the nuts securing it with the dishwasher. Then take off the panel.
- You can access the switch beneath the front access panel. Remove the switch by taking off the left locking tab from the switch and the right locking tab after disconnecting from the wire harness.
- You can install the new floating switch by connecting it with the wire harness.
- After this, reinstall the front access panel and the control panel.
- Run the dishwasher to check for any leaks.
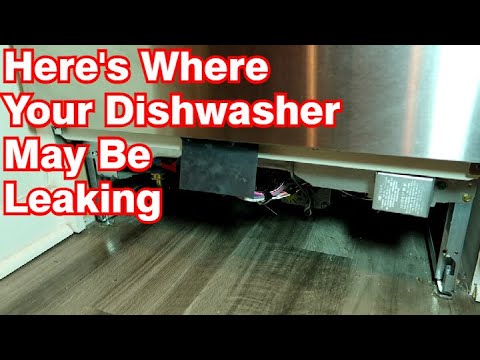
4. Damaged drain hose

As the name suggests, the drain hose will empty the filthy water starting from the drain pump, through the drain line, and finally into the sink drain.
The drain hose carries the process of draining water from the dishwasher.
It won’t be visible until you remove the kickplate to locate the hose pipe at the base of your dishwasher.
When the connection within the draining system becomes loose, or the drain hose wears out and gets holes and cracks, there are chances of leakage.
Fixing the drain hose is a little complicated, but you can do it efficiently by following the below-mentioned steps.
- Start by turning off the electricity.
- Take off the panel to access the drain hose unscrewing all the screws.
- Make sure your dishwasher door is shut.
- Now inspect the hose pipe for any damages and leaks.
- If you find cracks or holes, consider replacing them.
- Remove the clamps of the hose.
- Fix the new drain hose by following the same process you used to remove it.
Also read: 13 Reasons Why Your Amana Dishwasher Is Not Draining
5. The water inlet valve is not functioning well
You can find a water inlet valve inside the dishwasher, which you can locate on the lower panel’s lateral side.
You can find it attached with the two wire connections, one connecting the outlet hose with the dishwasher tub and the other connecting the hot water pipe from the domestic supply.
It plays an important role in the functioning of the dishwasher by opening the valve to supply hot water during the wash cycle and will close automatically once the desired water level is reached.
Leakage happens when the water inlet valve remains open even after the water is filled.
Usually, the opening and closing of the water inlet valve are monitored and controlled by the timer.
At times, the faulty timer will also cause this problem.
Most of the time, the water inlet valve malfunctioning is caused by the solenoid fault.
It would be best if you found the root cause of this issue to fix it efficiently.
In this case, you can consider hiring a professional.
Fixing the water inlet valve is quite technical, but I’ll try to explain it to you.
- Follow these steps carefully to fix it successfully.
- First, take off the kick plate panel to access the water inlet valve.
- You must unscrew the screws, disconnect the hose, and clamp to remove the water inlet valve.
- While removing the water inlet valve, you should be careful because you will find a part called the solenoid with two wires. You must disconnect these wires to remove the water inlet valve completely.
- Now it’s time to install the new water inlet valve by connecting it with the solenoid wires.
- You can screw the screws back, connect the hose and clamp it again.
- Place the kick plate panel.
- Run the dishwasher to check if it is still leaking.
6. Blockage of the drain path

Dirt and debris from the dishwasher travel through the drain path to get clogged at the surface of the drain path, blocking the water flow.
Here are a few things that can indicate the clogged drain:
- The unusual gurgling sound during the wash and rinse cycle indicates that the water is struggling to pass through the clogged drain surface.
- You can see the dishwasher water accumulating on the sink. It indicates that a clog on the drain prevents the water from flowing.
- You can confirm if your dishwasher is draining the water slowly.
- A clogged drain also produces an unpleasant smell throughout the dishwasher.
If you experience these in your dishwasher, you must know it’s because of the blocked drain.
You have to fix this as soon as possible to stop the leakage of your dishwasher in the basement.
You can clear the clog by running hot water.
If there is an intense clog, you can mix vinegar and baking soda by running the mixture throughout the drain path.
Doing this will clear the blockage and fix the leak.
7. Faulty Connections
There are water supply pipes, an air gap, and several other connections that can be seen in the dishwasher.
These connections may become loosened.
And several other dishwasher parts might be at fault for causing the leakage.
It would be tricky to find out the fault causing the leakage in the case of a loose connection.
You can seek professional assistance in such a case.
Also read: How Do You Cap Off A Dishwasher Drain Line?
8. Defective hose clamps

There are two types of hoses.
The water supply hose fills the dishwasher with water during the wash cycle, and the drain hose empties the filthy water after the wash cycle is completed.
Hose clamps usually secure these hoses.
You can locate these hose clamps by accessing the lower panel.
See if the clamps are loosened, you can use a screwdriver to tighten the clamps.
Sometimes, it can be damaged in such cases, and you must replace it.
9. Faulty pump
A faulty pump is the last one to check if you couldn’t find the cause of why your dishwasher is leaking in the basement, even after inspecting all the above causes.
You can find the pump at the lower end of your dishwasher.
It performs both the function of distributing and draining the water.
There is something called a pump seal which, in a faulty condition, can cause leakage.
If you find a pump in a damaged condition, there is no solution other than replacing it.
Replacing or repairing it is a complicated and risky process, so consider hiring a professional to do the job.
10. Misplaced dishwasher

The way you placed your dishwasher may also be a reason for it leaking in the basement.
While installing your new dishwasher, ensure you place it on a leveled surface instead of a surface that has bumps here and there.
You’re mistaken if you think it is not important to take care.
It has a major impact on the functioning of the dishwasher.
A dishwasher kept on an uneven surface will not only reduce the efficiency of cleaning but also causes water leakage.
Keeping it on a bumpy surface prevents the door from closing properly, and that will cause flooding in your kitchen area.
How to maintain a dishwasher?
Keeping the dishwasher clean and maintaining it with care will keep you away from all the troubles.
Here is how you can take proper care of it.
- Check your dishwasher if it has a filter. Remove the filter, and hold it under the running water to clean any dirt and debris accumulation. You can use soapy water to wash the filter if the dirt seems intense. Cleaning the filter regularly will increase the dishwasher’s efficiency, resulting in shining clean dishes at the end of the cycle.
- As discussed above, the rubber gasket is important in securing the dishwasher door. So, cleaning it to remove dirt and sticky materials will increase the lifespan of the gasket. You can use soapy water dipped in the cloth to wipe out the gasket at least once a month.
- Once in six months, remove the spray arms to clean them with a soft cloth. Wipe out all the accumulation with soapy water.
- Remove the drain hose at least once monthly, and run the hot through it. You can also use vinegar and baking soda to remove the stubborn strains.
- Avoid keeping the dishwasher unused for a long period. It is advisable to use the dishwasher at least twice a month.
Final thoughts
When your dishwasher leaks in the basement, start by checking the common causes, as mentioned in the article. Take proper care of the dishwasher by cleaning the water inlet valve and door gasket and unclogging the drain twice a year.
By following the step-by-step process mentioned in the article, you can fix the issue of your dishwasher leaking into the basement. However, some complex issues, like fixing the pump of the motor, need a professional’s assistance.
Reference: Home Plumbing CDC guidelines, Amana Official Troubleshooting, LG Official Manual, Whirlpool Dishwasher manual, Bosch Dishwasher troubleshooting.