Due to the increased wireless communications like Wi-Fi, the new houses do not have Ethernet. An Ethernet port connects internet-enabled devices like computers, game consoles, and fax machines. But can you install it on the wall? Let’s find out.
An Ethernet port can be installed in the wall by running an Ethernet cable through the wall using fish tape or a wire snake. Once the cable is in place, a hole can be cut in the wall, and an Ethernet jack can be installed on a wall plate. Finally, you can connect the Ethernet jack to the Ethernet cable.
There are several things to understand about Ethernet ports. Please read this article till the end to learn about the whereabouts of the Ethernet port, its pros, and cons, how to install it, and the dos and don’ts while installing it.

Check out our list of top-handpicked products for all your electrical, appliance, and HVAC system needs to keep your home running smoothly.
This post includes some affiliate links.What is an Ethernet port? Can you install it on the wall?
Ethernet Port is a fast connection that can provide many advantages over Wi-Fi connections, including improved security and fast network speed.
The Ethernet port, often called LAN port or network connections, in the wall are physical connectors that help devices like computers, servers, and game consoles to link with one another and access the web.
I use 2 adapters to link the router and device with the Ethernet cables and an outlet.
I have experience with both Wi-Fi and Ethernet ports. I prefer Ethernet Port over a Wi-Fi connection.
Unlike wireless connections, Ethernet provides a hardwired link between the device and your router.
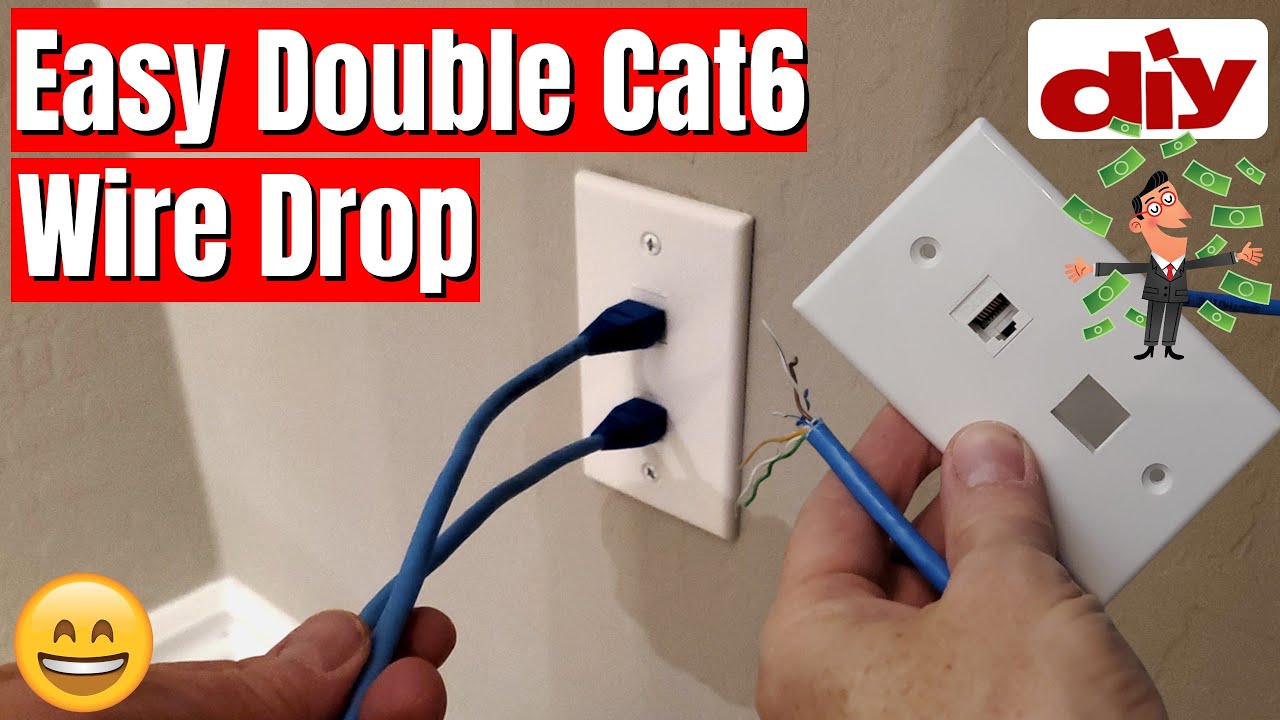
While installing the Ethernet Port in the wall of my house, I used two RJ45 connectors.
I place one on the wall and the other at the cable end connected via an 8-inch connector.
Ethernet ports can be easily installed on the wall without any problem. It is considered safer than Wi-Fi connections.
No one outside your house or business can access the data transferred over the wired connection. Your data is safe if it is correctly secured with passwords and other measures.
Since there are no interferences with Ethernet Port, I receive faster speed than the wireless networks with wired connections. I also do not need to worry about the security of it.
If you do not have any idea about the Ethernet Wall Port, imagine a phone wall outlet but slightly oversized. The Ethernet wall port will work the same.
Like the phone lines connected to the switchboard, the Ethernet cable connects to the router or modem.
Beyond Wireless: Exploring the Benefits of Hardwired Ethernet Connections
Ethernet Ports benefit houses and businesses by providing reliable network access without compromising security and speed.
Ethernet Port will also need a minimum setup, thus making it ideal for people who want to connect their computers quickly to other devices without tinkering around with the settings.
Ethernet Port uses cables instead of radio waves and, thus, does not suffer from interruptions like in Wi-Fi connections.
It further also keeps humans from suffering from these radio waves.
Types of Ethernet Wiring to install
Several wires will have varying speeds for GB (gigabyte) per second and MB (megabyte) per second. The speed shows how fast you can download images, videos, GIFs, and other things.
Here are 6 best wire options for Ethernet Port wiring:
- CAT5 – 100 Mbps, 328-foot distance
- CAT5e (enhanced) – 1 Gbps, 328-foot distance
- CAT6 – 1 Gbps/10 Gbps, 328-foot distance/180-foot distance)
- CAT6a (augmented) – 10 Gbps, 328-foot distance
- CAT 7 – 10 Gbps, 328-foot distance
- CAT8 – 40 Gbps, 90-foot distance
The maximum distance for most cables will be 328 feet or 100 meters. The distance indicates the ideal length at which the cable can work.
DIY Guide: Step-by-step Instructions for Installing Ethernet Ports in Walls
Installing an Ethernet Port in the wall is straightforward but difficult for beginners.
If you are a beginner, consider hiring a professional to install the Port in the wall and avoid doing it yourself.
You can do it yourself if you have the license to do such work or have previous experience.
Step 1: Gather supplies
Begin with determining the number of Ethernet cables and their length, the number of wall plates and jacks, the wall condition, the outlets, and other pre-existing components.
If you have a modem or router, you do not have to buy one. You can utilize the remaining LAN wires if you have the right length.
Besides these, you need an electrical tester, wire cutters or strippers, a drill with bits and screws, and a power outlet box.
Step 2: Find a proper location
You need an ideal location for the wall plate and the jack.
Inspect the drywall or concrete, the router, the modem’s location, and the room’s layout. Now, find an area next to the electrical socket for an outlet.
The drywall should be easily traced and cut to install the wall plate and the wires.
Cracking the wall to fit the cables can be challenging, especially when you have no idea about the renovation.
Install a cord hider or concealer running above the wall surface for the wall.
Step 3: Create and cut the outlet
Outline the area on the wall by measuring the wall mount against it.
With a pencil or marker, draw an exterior outline border of the wall mount.
Line the wall plate evenly with the closest electrical outlet and ensure uniformity.
You can also use a bubble level to check the top and bottom edges. They should be perfectly parallel to the floor.
Turn off the electricity of the outlet next to the wall plate to prevent electrocution.
Cut along the outlined area with a serrated utility knife, or drywall saw. Gently move the knife through the outline to cut neatly and precisely.
Please do not make the hole too big, as you can’t adjust it later. But if the hole is small, you can always go back to adjust it.
Step 4: Run the cable to the jack
Depending on your router’s location, drill a hole in the ceiling, adjoining wall, or floor under to run the wire cable.
Use a power drill with a ½ inch to make a hole in the wall and route the cable from the router to the wall’s electrical outlet.
Run the Ethernet cable from the networking hardware to the outlet. The length of the wire (CAT5 or CAT6) should depend on the distance between the hardware and the outlet.
Feed the cable through the opening outlet near the router and into the wall socket. Keep the cable slightly longer to work it around.
Secure the mounting bracket on the wall and tighten it by drilling screws.
If you have more than one cable, use tape around the wires and keep them together.
Step 5: Wire the Ethernet cable
Strip off the insulation with a clamp tool and press it to remove the sheeting.
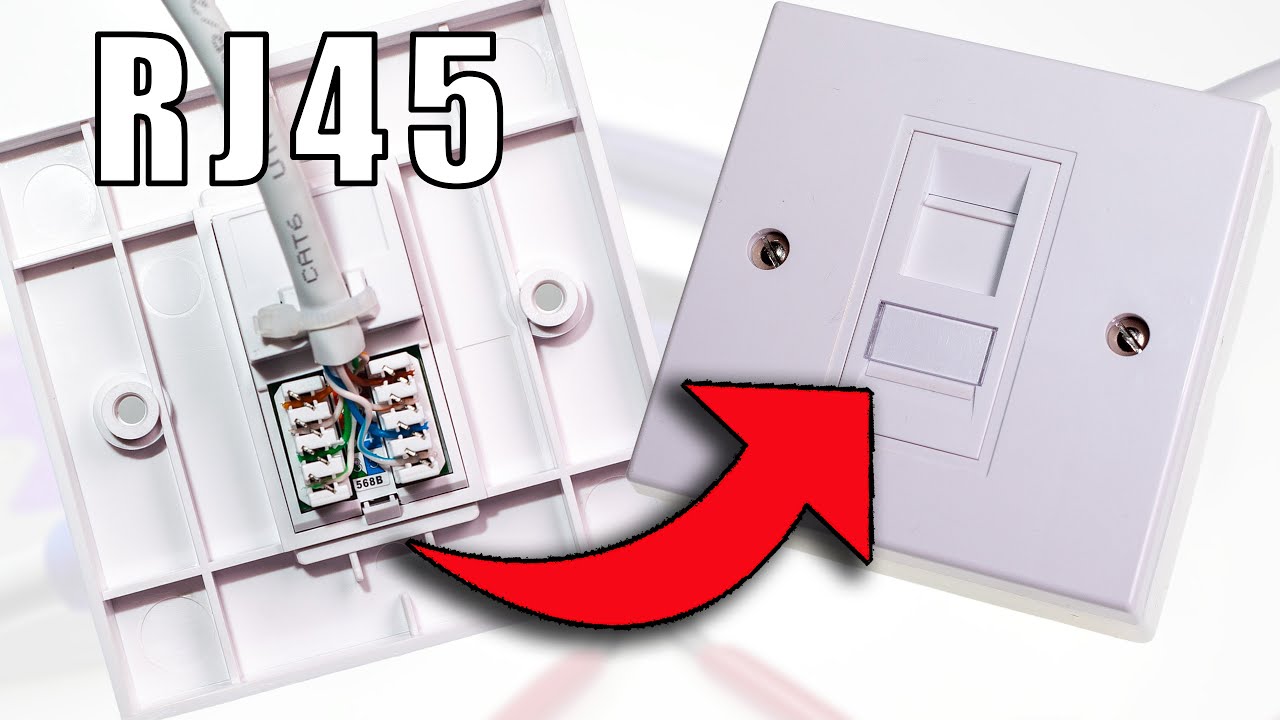
Remove the cable cover and expose the wires. Place these wires into the color-coded slots of the keystone connector.
Align the wires correctly to their corresponding slot with a T568A or T568B configuration.
Now, plug the wired connector head into the wall place.
Step 6: Install the wall plate
Attach the wall plate over the mounting bracket and finish the installation.
Drill or take a screwdriver to install the screws in the respective holes. Activate the Ethernet Port by plugging it into the correct LAN switch on the router.
Check whether the cable is working or not by the color of the router. It should be green, indicating that there is a good connection.
Yellow or red color means you have a signal issue.
Now, turn on the power to the electrical socket.
Step 7: Repair the walls
When you install any electrical outlets or wires, they will leave a few holes in the drywalls.
Replace the baseboards and patch the drywall holes before you prime and paint.
How do you test the Ethernet Port In-wall connection?
Testing the In-wall Ethernet port, whether or not it is not working, is easy. Here are the steps to test it:
Connect the cables
To connect the cables, take two RJ45 connectors for each cable end.
Ensure that both ends are tightly connected, and attach the connectors to the ports on either side of the wall.
While connecting the cables, ensure that the colored wires match the connectors, for example, green with green.
It will transfer the data between devices on either side of the wall.
Check the network settings
When you connect the cables, check the network settings as well. Open the settings and ensure that all the IP addresses are correct and within range of each other.
There should not be any disputes between the devices or networks. That can cause issues when you try to establish a connection later.
Test the connection
Now, test the connection.
Test your network connection with tools like ping tests or traceroute, sending packets between devices over the internet.
If the connections are good, the packets should travel back and forth without interference.
If something is wrong during the test, it will show cable or hardware issues. You must troubleshoot the problem before you set up the other things.
Another method if you do not have a sniffer:
- Take the Ethernet cable to connect the device to your TV or computer.
- Install a browser or experiment with another online web. You can confirm the functionality of the Ethernet Port.
- Plug the modem or router’s Ethernet wire into the Ethernet device’s WAN port.
- Connect the computer’s Ethernet to the switch’s LAN1 port.
- Press the RESET button to restart the modem or the router. If it has no power button, reboot it by removing the plug from the outlet and wait a few seconds.
- Now connect the Ethernet switch’s power adapter to the outlet.
- The Ethernet switch’s WAN and LAN1 ports should have green lights above them.
- Install a browser to understand whether you can access the online resources.
- If needed, repeat the process with LAN2.
The Dos and Don’ts of Installing Ethernet Ports in the Walls

When things are about the Internet, the first thing we take into account is the Internet Service Provider or ISP. But it is not for the Ethernet wiring.
Maximum ISP does not deal with anything except the router and the modem. Some internet service companies provide Ethernet installation, whereas others need an electrician.
Here are some Dos and Don’ts to follow while installing Ethernet Port in your house or office wall:
The Do’s
- Find a proper location for your Ethernet Jack. It must be away from obstructions and near an electrical outlet. Install the Jack as close to the internet network hardware as possible for the best results.
- Before you install the Port, wires, or jack, mark the locations where you will install them with a pencil or mark. It will allow you to see and judge your decisions and make changes if you want any.
- Before the installation, turn off the power to all the electrical circuits, especially the outlet where you will install the Ethernet. It will prevent unexpected shocks.
The Don’ts
There is only one thing you should not do: install the Ethernet Port yourself without any prior experience.
Installing the Port involves cutting the drywalls, drilling holes, adjusting and connecting wires, and many other things which need an expert.
A qualified professional knows all the proper steps to install it, and they can do it correctly, safely, and within less time.
They know how to snip off excess cable, strip cables with a wire stripper, or thread the exposed wires.
Most Ethernet cables will have 4 pairs of colored wires which need to be separated. There is a lot of stuff to understand.
Even though I have shared the steps to install the Ethernet Port, you should consult an electrician to install it to avoid mistakes and receive the best services from the Ethernet.
Cost of installing an Ethernet Port
According to maximum house owners, the cost of installing an Ethernet Port in the wall depends on the difficulty level, connection type, and the professional’s rate.
Installing the Ethernet Port is challenging for people with zero technical knowledge. So, you must hire a professional.
According to research, the average cost of installing an Ethernet Port in a large office is around $3,800, signifying the installation of 2,000 feet of CAT6 cable up to 8 connections.
On the contrary, setting up the Ethernet Port for a short connection in a house with 2 rooms will cost $100.
Here is a brief breakdown of the cost:
- Cables – Coaxial Cables cost $0.06 to $0.17, Twisted Pair cost $0.10 to $1.13, and Fiber Optic Cables cost $0.8 to $4.6
- Wall plates – $10 to $25 each
- Network Switch – $10 to $100
- Ethernet Port – $10 to $25 each
- Modem – $50 to $100
- Router – $80 to $120
- Labor cost – $50 to $100
The cost can vary based on your location and the professional’s rate.
You can save money by installing the Ethernet Port yourself. However, it is better to hire an electrician.
At least, you need to know basic networking and knowledge about the installation to know what the professionals are doing.
Enhancing connectivity: Pros and Cons of installing Wall Ethernet Port
Never think that wires belong to the 1990s. Till now, they have been of great use for network connections.
A home with high-tech wireless capacity can still require the Ethernet Port for maximum speed and efficiency.
However, with advantages comes drawbacks. This section discusses some advantages and disadvantages of using Ethernet Port.
Advantages
- Ethernet Port can provide you with a high-speed network with zero data loss.
- The radio and short-range signals will not interfere with the network connections.
- Walls can block Wi-Fi signals and provide an unreliable network. Ethernet ports can avoid Wi-Fi drops and frozen Zoom calls.
- You can receive excellent rapidity by getting 10 Gbps of data unavailable with Wi-Fi connections.
- You can plug in multiple Ethernet (LAN) cables to support more than one device together.
- Wired networks provide more security than Wi-Fi networks.
- There are no radio waves to harm humans.
Disadvantages
- When you use old cables like CAT4, your speed will get limited up to 100Mbps.
- The Ethernet Port can be prone to physical damages, like wire breakage or burnouts.
- The Ethernet Port contains limited flexibility. Therefore, you cannot increase its outreach like Wi-Fi.
- You must adjust the desk and computers based on your Ethernet Port’s location. It is frustrating.
- The materials and labor cost to install the Ethernet Port is higher than Wi-Fi.
Troubleshooting common issues with Ethernet port
Even if the Ethernet Port will provide you with better benefits than the Wi-Fi connections, you will face some issues while using them.
Fortunately, you can troubleshoot the problem and use Ethernet Port without obstacles.
Below are some common issues you can face and their solutions:
Ethernet Wall jack slow speed
There will still be some areas where you will face slow speed from the Ethernet Wall Port.
I have mentioned before once that the Ethernet Port will provide higher speed due to the lack of interference in the microwave.
If electrical devices like microwaves, cordless phones, or fluorescent lighting fixtures are nearby, they might cause interference.
You can fix it by keeping these devices away from the Ethernet cables.
Use a shielded cable with extra shielding to reduce the interruption level picked by the Ethernet cords.
The next reason for the slow speed is the cable quality.
Cables made with low-quality materials will wear out faster and reduce the speed due to the decreased signal strength.
So, use the best quality cables for the best performance and high speed.
The last reason is the data type sent through the Ethernet Wall Jack.
When you send large files or stream videos in your network connection, it will take more time than text messages or website browsing.
Large files have more data to transfer, so it takes more time. So, you might feel like the speed is slower, but that is not the case.
Ethernet Port In-wall is not working
When Ethernet Port In-wall does not work, check for the following things:
- Check for power if the Ethernet Port is not working. Check the breaker box or surge protector, and examine for loose cables. Make sure the Ethernet Port is receiving enough power.
- If the power is on, check your connections. Ensure that the cables are secured tightly and not damaged.
- Try unplugging and plugging each of the cables once to double-check the connections.
- Check whether the Ports are secured and not loose or damaged.
- Remove the cable from the connector and replace it with a new CAT5 or CAT6 if damaged.
- If there are loose connections, reclamp the Ethernet wires properly into the connector.
- If the connections are secured, ensure all the devices are connected to the same network and have access to the same internet connection.
- If everything is fine, but there is still a problem, reset your router or modem in case something got changed by mistake within the settings.
- Buy a network cable tester to check the Ethernet connector before you plug it into the wall plate.
Some problems are hard to fix, but some will need expert assistance.
If you cannot solve the problem in your Ethernet Port, consider hiring an electrician to get the problem solved.
The ethernet port in the wall is too small
If house members depend on a constant network, it must be reliable and fast.
But if the cable does not fit into one of the ports, you can try a few options below:
- Try another if one Ethernet socket misfits the cable.
- Some ports have other doors near the Ethernet connector. The port will have a minor glitch if you do not open the door. Open the door and find the correct connector size for the Ethernet cable.
- Ethernet ports have pulled-down clips. Pulling them down will prevent the Port and Cable from inserting fully. You can experiment with angling the clip from its central point.
- Connect the Ethernet Port to the laptop or computer with the USB-C or USB-A ports. Additionally, you can use the Ethernet adapter.
- If the above methods fail, contact a technician to check and replace the port.
Final thoughts
Ethernet Ports can still act better in the era of wireless communications than Wi-Fi connections. You can install an Ethernet Port on the wall. Though you can install the port yourself, you should hire an electrician if you do not have any experience.
If you have done such work before and have the license, use the above-explained step guide to install the Ethernet Port on your room’s wall.
Ethernet ports can provide better connection and enhanced security than Wi-Fi connections. But the cost to install the Port is relatively high.
What is the internet port in the wall called?
The internet port is what we call an Ethernet Port or RJ-45 port. It contains 8 pins resembling a large telephone jack. It is a gateway from the device to the internet connection provider.
What do the different lights in the Ethernet Port mean?
In Ethernet ports, amber means a connection is not active, or data transmission has stopped, indicating a problem in the software issue. Yellow means slow connection or low bandwidth usage. Green means an active internet connection.
How do I know whether the Ethernet Port is working?
The connection shows a green indicator displaying CONNECTED when the Ethernet Port works.
Reference: Ethernet Wikipedia